이 글은 리액트 공식 문서와 이 영상을 참고해서 정리한 글이다. 영상이 아주 잘 정리되어 있어서 보는 것을 강력히 추천한다.
(영상제작자에게 허락 받았습니다)
useReducer의 세 요소
useReducer의 구문을 먼저 살펴보자.
const [state, dispatch] = useReducer(reducer, initialState);
useReducer는 useState와 같이 상태 관리를 할때 사용하는 훅이다. useState와 육안으로 구분되는 점은 dispatch와 reducer다. 이 둘은 함수인데, 각각 형태는 아래와 같다.
dispatch(action)

reducer(state, action)
여기서 주목해야할 점은 dispatch 내부의 action이 reducer의 두 번째 인자로 간다는 점이다. reducer의 첫번째 인자(state)는 관리의 대상이 되는 '상태 객체'다. dispatch는 이미 구현 완료된 함수이기 때문에 action에 적절한 값을 넣어주기만 하면 되지만, reducer는 직접 구현해줘야 한다. 예제를 보면 이해할 수 있을 것이다.
useReducer의 내부 로직을 이해하기 위해서는 useReducer의 세 요소를 알고 있어야 한다. 세 요소는 Dispatch, Action, Reducer이며, 각각 역할은 아래와 같다.
reducer → state를 update 해준다.
dispatch → Reducer에게 요구하는 행위
action → Dispatch(요구) 내용
state를 update하는 주체는 reducer 임을 꼭 기억하자! 그리고 dispatch(actoin) 은 세트다. dispatch 호출시 reducer가 trigger 된다.
예제1 - 카운터
먼저 공식문서의 예제를 살펴보자. 코드는 간단하다.
const initialState = {count: 0};

function reducer(state, action) {
  switch (action.type) {
    case 'increment':
      return {count: state.count + 1};
    case 'decrement':
      return {count: state.count - 1};
    default:
      throw new Error();
  }
}

function Counter() {
  const [state, dispatch] = useReducer(reducer, initialState);
  return (
    <>
      Count: {state.count}
      <button onClick={() => dispatch({type: 'decrement'})}>-</button>
      <button onClick={() => dispatch({type: 'increment'})}>+</button>
    </>
  );
}
reducer, dispatch, action 위주로 분석해보자. 우선, 상태를 업데이트 하는 주체는 reducer이고, 이는 직접 구현해줘야 하는 부분이다. 상태가 변하는 시점은 버튼을 클릭했을 때다.
1) 플러스 버튼 클릭시
- dispatch가 reducer에게 action을 요구한다. (actoin = {type: 'increment'})
- action 객체의 type 속성값은 'increment'이므로, state는 1 증가한다.
2) 마이너스 버튼 클릭시
- dispatch가 reducer에게 action을 요구한다. (actoin = {type: 'decrement'})
- action 객체의 type 속성값은 'decrement'이므로, state는 1 감소한다.
예제2 - TodoList
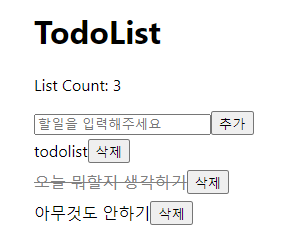
약간 코드가 복잡하지만 로직 자체는 간단하다. 전체 코드는 접은글을 펼치면 확인할 수 있다. UI는 아래와 같다.

App.jsx
import React, { useState, useReducer } from 'react';
import { List } from './List'

const reducer = (state, action) => {
  switch(action.type) {
    case 'add-list':
      const title = action.payload.title;
      const newList = {
        id: Date.now(),
        title,
        isHere: false
      }
      return {
        count: state.count + 1,
        lists: [...state.lists, newList],
      };
    case 'delete-list':
      return {
        count: state.count - 1,
        lists: state.lists.filter(list => list.id !== action.payload.id)
      }
    case 'mark-list':
      return {
        count: state.count,
        lists: state.lists.map((list) => {
          if (list.id === action.payload.id) {
            return {...list, isHere: !list.isHere};
          }
          return list;
        })
      }
    default:
      return state;
  }
}

const initialState = {
  count: 1,
  lists: [
    {
      id: Date.now(),
      title: 'todolist',
      isHere: false,
    },
  ],
}

const App = () => {
  const [title, settitle] = useState('');
  const [listsInfo, dispatch] = useReducer(reducer, initialState);

  return (
    <div style={{ padding: '40px' }}>
      <h1>TodoList</h1>
      <p>List Count: {listsInfo.count}</p>
      <input
        type='text'
        placeholder='할일을 입력해주세요'
        value={title}
        onChange={((e) => settitle(e.target.value))}
      />

      <button onClick={() => {
        if (title !== '') {
          dispatch({type: 'add-list', payload: {title}})
          settitle('')
        }
      }}>
        추가
      </button>

      {listsInfo.lists.map((list) => {
        return (
        <List
        key={list.id}
        title={list.title}
        dispatch={dispatch}
        id={list.id}
        isHere={list.isHere}
        />
        )
      })}
    </div>
  )
}
List.js
import React from "react";

export const List = ({ title, dispatch, id, isHere }) => {
    const action = {
        type: 'delete-list',
        payload: { id }
    }
    return (
        <div>
            <span
             style={{
                display: 'inline-block',
                margin: '5px 0px',
                textDecoration: isHere ? 'line-through' : 'none',
                color: isHere ? 'gray' : 'black',
                cursor: 'pointer'
             }}
             onClick={() => {
                dispatch({type: 'mark-list', payload: { id }})
             }}
            >
                {title}
            </span>

            <button
             onClick={() => {
                dispatch(action)
             }}
            >
                삭제
            </button>
        </div>
    )
}
reducer, dispatch, action 위주로 분석해보자. 상태를 업데이트 하는 주체는 reducer이고, 이는 직접 구현해줘야 하는 부분이다. 상태가 변하는 시점은 아래 세 가지 케이스로 나눌 수 있다. 참고로 입력란에 글을 작성하는 상태 변화는 제외시켰다.
1) 추가 버튼 클릭시
- dispatch가 reducer에게 action을 요구한다. (action = { type: 'add-list', payload: { title } })
- action.type으로 reducer 내부 switch문 어느 한 곳의 코드를 실행시킨다.
- action.payload를 참고해서 상태를 업데이트한다.
2) 삭제 버튼 클릭시
- dispatch가 reducer에게 action을 요구한다. (action = { type: 'delete-list', payload: { id } })
- action.type으로 reducer 내부 switch문 어느 한 블록을 실행시킨다.
- action.payload를 참고해서 상태를 업데이트한다.
3) 텍스트 클릭시
- dispatch가 reducer에게 action을 요구한다. (action = { type: 'mark-list', payload: { id } })
- action.type으로 reducer 내부 switch문 어느 한 곳의 코드를 실행시킨다.
- action.payload를 참고해서 상태를 업데이트한다.
흐름은 간단하다. 상태 변화 이벤트가 발생하면 dispatch → reducer 순서로 호출되고, reducer는 action을 참고해서 상태값을 변화시킨다.
아래와 같은 패턴은 자주 사용되니 참고하자!
const reducer = (state, action) => {
  switch(action.type) {
    case 'add-list':
      // action.payload.data1 를 활용해서 상태 update
    case 'delete-list':
      // action.payload.data2 를 활용해서 상태 update
    case 'mark-list':
      // action.payload.data3 를 활용해서 상태 update
    default:
      return state;
  }
}
<참조>
https://ko.reactjs.org/docs/hooks-reference.html#usereducer
https://www.youtube.com/watch?v=tdORpiegLg0&list=PLZ5oZ2KmQEYjwhSxjB_74PoU6pmFzgVMO&index=8
'React' 카테고리의 다른 글
| [ React ] styled components 사용법 간단 정리 (0) | 2022.07.02 |
|---|---|
| [ React ] React Redux API (with 카운터 예제) (0) | 2022.06.25 |
| [ React ] useRef를 알아보자 (0) | 2022.06.23 |
| [ React ] React Router 사용법 (v6) (0) | 2022.06.17 |
| [ React ] useEffect와 컴포넌트 생명주기 (0) | 2022.06.12 |

